F-Stop Printing: The Complete Darkroom Workflow
14 min read by John Jones.Published on .

There’s a moment in the darkroom that every f-stop printer remembers:
You’ve just pulled a test strip out of the developer, and instead of squinting at seven bands trying to will one of them into being correct, the answer is just there, obvious. The right exposure sits in the middle of a strip where every step above and below it looks like an equal distance away.
For a few seconds, the darkroom stops feeling like a place where you solve problems and starts feeling like a place where you make pictures. Then you get back to work, but something has shifted.
That shift is what f-stop printing does. It’s not a complicated system.
F-stop printing applies the same logarithmic exposure logic you already use when you shoot, baked into every shutter speed scale and aperture ring you’ve ever touched, to the one place in the photographic process where it was always missing: the enlarger.
This guide will walk you through exactly how to do it, from reading your negative to dialling in a final time to dodging and burning with precision you probably didn't think was possible. If you’ve been printing with linear timing, you can start tonight.
In this guide: The core concept of f-stop printing. Reading a negative for base time. Making the test strip. Dialling in: from a test strip to the work print. Dodging and burning in stops. The tool question. Start tonight. Support this blog & get premium features with GOLD memberships!
The core concept of f-stop printing.
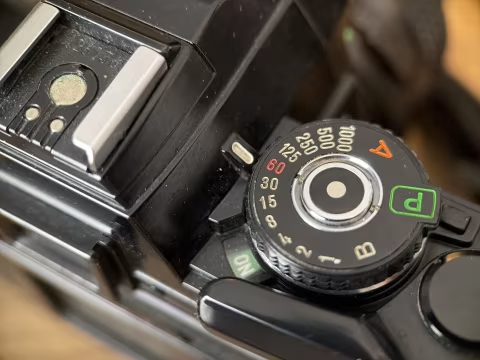
Every shutter speed scale you’ve ever used is a logarithmic sequence. So is every aperture scale. So is the ISO scale on your light meter. When you move one stop in any direction, you’re not adding or subtracting a fixed amount of light. You’re multiplying or dividing by a constant factor. Your eye and brain work the same way. A jump from 1 second to 2 seconds looks like the same perceptual step as a jump from 10 seconds to 20 seconds, because in both cases, you’ve doubled the light. The absolute numbers are different, but the relationship is identical.
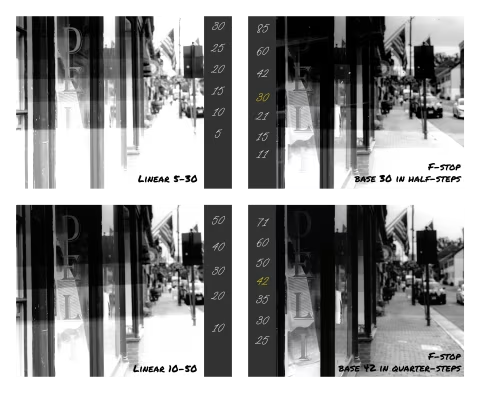
Linear darkroom timing ignores all of this. A test strip at 5, 10, 15, 20, 25, and 30 seconds looks like equal steps on paper, but the perceptual difference between 5 and 10 seconds is enormous, while the difference between 25 and 30 seconds is barely visible. You’re not getting six useful readings. You’re getting two or three good ones buried in noise.
F-stop timing fixes this by spacing exposures the way your eye actually perceives them. The math is simple:
Each half stop multiplies the previous time by 1.41 (the square root of 2). Each quarter stop multiplies by 1.19.
There are several ways to work out these numbers in practice, from printed tables to phone apps to dedicated timers, and we’ll cover those options shortly.
Here’s what that looks like with a 20-second base time:
• Full stops: 5, 10, 20, 40, 80 seconds
• Half stops: 10, 14.1, 20, 28.3, 40 seconds
• Quarter stops: 14.2, 16.8, 20, 23.8, 28.3 seconds
Notice what’s useful about this. Every band on a half stop test strip represents the same perceptual jump as every other band. When you pick the one that looks right, you’re picking from a map where the intervals mean something consistent. And when you move to a finer bracket, you're zooming into that same map rather than starting over.
The other thing worth understanding now: these ratios are portable. A burn of plus one-third stop takes the same proportional bite out of your highlight, whether your base time is 15 seconds or 45 seconds. That's the property that makes f-stop notation useful for keeping printing notes that actually transfer across sessions, papers, and negatives.
Reading a negative for base time.
The first question every printing session starts with is the same: Where do I begin? With linear timing, this is often a guess that gets refined through wasted paper. With f-stop printing, your starting point matters less than you might think, because the methodology is designed to converge on a correct answer quickly, regardless of where you enter. That said, a reasonable starting point saves paper and time, and reading your negative is a skill worth developing.
Here’s how it works:
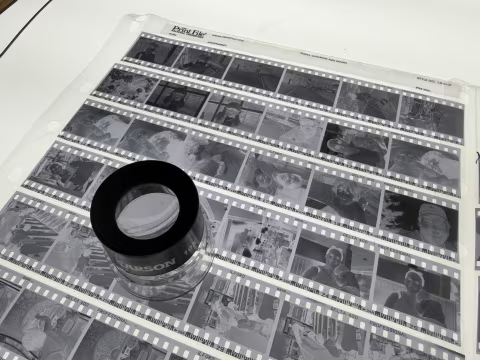
Hold your negative up to a consistent light source, ideally a light table, and look at the overall density. A well-exposed negative will have detail visible in both the shadow areas (the thin, more transparent parts of the negative) and the highlights (the dense, darker parts). What you’re trying to estimate is how much light needs to pass through that negative to land a good exposure on your paper.
Thin negatives, which are underexposed or underdeveloped, transmit more light. They generally need shorter base times, somewhere in the range of 10 to 20 seconds at a mid-range aperture like f/8. Dense negatives, which are overexposed or overdeveloped, block more light and typically need longer times, often 30 to 60 seconds or more. A normally exposed negative usually lands somewhere in the 20- to 30-second range as a starting point.
If you’re uncertain, 30 seconds is a forgiving default for most negatives at f/8. The beauty of the f-stop method is that a coarse first test strip at full-stop intervals will cover a wide enough range that even a poor initial guess puts the correct exposure somewhere on the strip. You’re not trying to be right on the first attempt. You’re trying to get close enough that the second strip can finish the job.
One practical note: set your enlarger aperture before you start estimating. The aperture you choose affects your base time, and a consistent aperture across sessions makes your printing notes more useful over time. Most printers settle on f/8 or f/11 as their default, stopping down from wide open to get sharper, more even image quality across the print area without going so far that diffraction softens things.
Making the test strip.
The test strip is where f-stop printing pays its first dividend, and the physical process is slightly different from what you may be used to.
Start with a strip of paper that covers a representative cross-section of your image. This is worth thinking about for a moment. A strip pulled from a corner of sky or an unexpressive shadow won't tell you much. You want a piece that includes the tonal range you actually care about: a face, a textured surface, the area where shadow meets highlight. Cut your strip before you turn the enlarger on and keep it in your paper safe until you're ready.
For your first test strip on a new negative, use full stop or half stop intervals and bracket generously around your estimated base time. If your starting point is 20 seconds, test at minus 2 stops, minus 1 stop, base, plus 1 stop, and plus 2 stops. That gives you five bands covering a range from 5 seconds to 80 seconds, and the correct exposure will almost certainly be somewhere in there.
The physical process works like this:
Place your strip on the easel and cover all but one section with a piece of opaque card. Expose for your first interval, then slide the card to uncover the next section and expose again. Repeat until every section has been exposed.
Because each exposure adds to the previous one, the section that was uncovered first receives the most cumulative light and will be your darkest band. Work from your shortest time to your longest, uncovering progressively more of the strip with each step.
Develop your strip normally, fix, and evaluate it under a consistent light source. What you’re looking for is not just which band looks pleasant overall, but which band shows the right relationship between your shadow detail and highlight separation. A band that looks bright and appealing when wet may dry down noticeably, so if you’re printing on a paper you know well, factor in roughly a 10 to 15 percent dry-down in your evaluation.
Once you’ve identified the best band from your coarse strip, you have a target stop value. Your second strip brackets that value at a finer interval, typically quarter stops above and below. This second strip is a short process: three to five bands, centred on your target. When you pull it from the developer, you’ll have a work print time you can trust.
Because this two-pass process converges on a correct exposure so efficiently, one of the quiet benefits of f-stop printing is that it changes your relationship with paper. When you know that two strips will reliably get you to a solid work print time, using a full sheet for each strip starts to feel reasonable rather than extravagant. The paper cost of the test process drops, and more of your session gets spent making actual prints rather than chasing an exposure.
Dialling in: from a test strip to the work print.
Once you have a work print time from your second strip, the temptation is to immediately make a final print. Resist it. The work print is a specific and useful thing, and understanding what it is will save you paper and frustration.
A work print is a full-sheet print made at your dialled-in base time with no dodging or burning. Its purpose is to show you the image at correct overall exposure so you can evaluate what needs local adjustment. It is a reference, not a finished print. Making it on a slightly smaller sheet or a less precious paper is perfectly reasonable.
When you pull the work print from the developer, you’re not asking whether it looks good. You’re asking two more specific questions. First, is the overall exposure right? If the answer is yes, you move on. If it’s close but not quite there, you now have enough information to make a precise correction: you know your current time, and you know approximately how much you need to add or subtract, expressed in stops. Half a stop more is a specific instruction. “A bit more” is not. Second, which areas need dodging or burning, and by roughly how much?
Keeping notes in stops rather than seconds is the habit that makes all of this compound over time. If you write down that a particular negative prints well at 28 seconds on Ilford MGRC, that note is only useful if you’re in exactly the same setup next time. If you write down that the base time was a touch under 30 seconds at f/8 and the sky needed plus one third stop of burning, that note travels. Change your paper, change your enlarger height, come back to the negative six months later: the stop relationships hold even when the raw seconds don’t.
Dodging and burning in stops.
This is the section that most f-stop tutorials either skip or under-serve, and it’s where the methodology earns its keep most completely. Dodging and burning in stops is not just a cleaner way to notate what you’re doing. It changes the quality of the decisions you make at the easel.
With linear timing, a burning decision sounds like this: the sky is too light, I’ll give it another eight seconds. That number is essentially arbitrary. It’s a guess calibrated by experience, and it doesn’t transfer. If you change your base time on the next session, or switch papers, that eight seconds means something completely different.
With f-stop timing, the same decision sounds like this: the sky needs plus one half stop. That instruction is meaningful independent of your base time. If your base time is 20 seconds, plus one half stop is 28.3 seconds of additional exposure. If your base time is 40 seconds, plus one half stop is 56.6 seconds. The ratio is the same. The visual result is the same. The note in your printing log travels.
Here is how to approach a concrete example. Suppose you have a landscape print with two problem areas: a bright sky that needs burning and a shadowed foreground that needs a touch of dodging.
For the sky, you evaluate the work print and decide it needs roughly one stop more exposure than the base. You burn it in for a time equal to your base time, targeting the sky area while shielding the foreground. If that feels like too much after the next test, you dial it back to two thirds of a stop. Each adjustment is precise and repeatable.
For the foreground shadow, you decide it needs about one third stop less exposure than the base. You dodge it during the base exposure by holding back light for a portion of the total time. One third stop less exposure means your dodge time is roughly 21 percent of your base time. At 30 seconds base, you’re dodging for about 6 seconds.
The percentages sound fussy written out, but in practice, you internalize them quickly. Plus or minus one stop is double or half. Plus or minus one half stop is the 1.41 factor. Plus or minus one third stop is around 26 percent more or less. A few sessions and these become instinctive.
One additional note for variable contrast paper users: the same stop logic applies when you’re burning with a different filter grade than your base exposure. A grade 5 burn to punch up contrast in a highlight is still expressed as a stop value relative to your base. The filter changes the contrast of the burn; the stop value controls its intensity. Keeping these two variables separate in your notes makes it much easier to repeat or adjust a complex print.
The tool question.
You don’t need anything special to start printing this way tonight. The barrier to entry is lower than most people assume.
The most no-frills starting point is a printed reference table. Here’s what those sequences look like across the base times most printers work with. All times are in seconds, rounded to one decimal place:
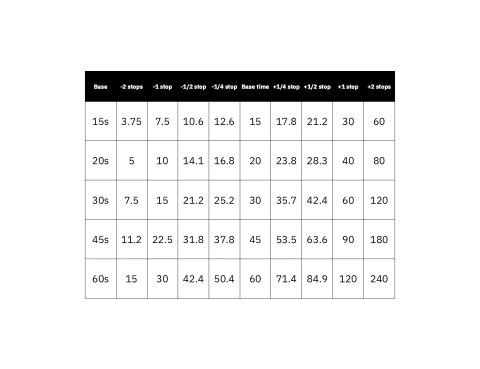
Print this out, laminate it, and keep it on your enlarger shelf. You look up your base time, read off the sequence you need, and set a standard interval timer for each value manually. It works. It’s slow, and it interrupts the rhythm of a session, but it’s a perfectly legitimate way to decide whether f-stop printing is worth committing to before investing in anything further.
An app is the next step up. The f-Stop Printing Calculator by Digitaltruth Photo and Bruce Tanner is the one most darkroom printers reach for. It’s free, available for iOS and Android, and there’s also a web-based version if you’d rather not install anything. It includes a red light mode designed to reduce screen brightness in the darkroom, though you should keep it well away from light-sensitive materials and turn brightness to a minimum. The obvious downside is that fumbling with a touchscreen while your hands are wet and your eyes are adjusted to a safelight is exactly as awkward as it sounds. But it removes the table lookup and gets you moving considerably faster.
A dedicated hardware timer is where the workflow becomes what it’s supposed to be. A good f-stop timer lets you dial in a base time and interval, then step through a test strip sequence with a single button or a foot switch, with a readout that shows where you are in the sequence without any mental arithmetic in the dark. The foot switch, in particular, changes the ergonomics of the whole session. Your hands stay on the paper and the dodging tools.
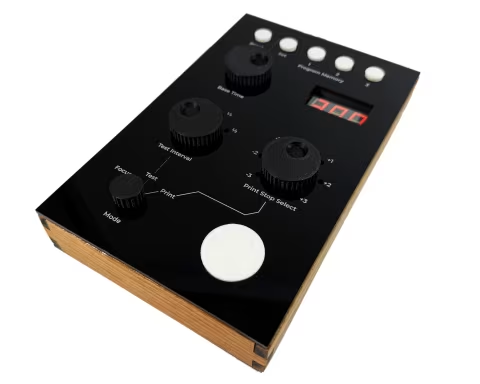
Professional dedicated timers have existed for decades, but have historically carried prices that put them out of reach for most home printers. That access problem is part of why f-stop printing stayed niche for as long as it did, and it’s what I set out to solve when I built the ΔStop.
ΔStop is a fully featured f-stop timer available as an assembled unit at $300, as a kit for those who want to build it themselves, or as open-source files for anyone who wants to take the design further.
The open-source release isn’t an afterthought. The analog photography community runs on shared knowledge, and I’d rather this tool reach as many darkrooms as possible than sit behind a price point that excludes people.
Find it at deltastoptimer.com.
Start tonight.
F-stop printing is not a complicated system. It’s the same system you already use every time you pick up a camera, applied to the one place in the photographic process where it was always missing.
The path in is as shallow or as deep as you want it to be. Print the table from the last section and try a coarse full-stop test strip on your next session. That’s it. You don’t need new equipment, you don’t need to read a book first, and you don’t need to commit to anything. Just make one test strip the way your aperture ring works instead of the way a ruler works, and see what you think.
Most printers who try it don’t go back. Not because f-stop printing is precious or dogmatic, but because once you’ve evaluated a test strip where every band represents an equal perceptual step, a linear strip just looks like noise. The answer stops being something you squint at and becomes something you read.
